


Create perfect bow tie inlays using this router template.
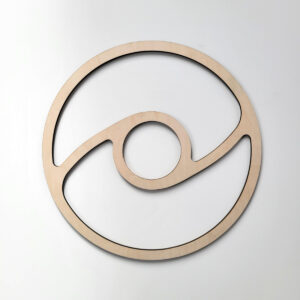
This ‘bow tie’ template allows you to inlay 3 different sizes of bow ties using a router. No chisels required!
How to use: This template is designed to be used with a router inlay kit. The kit should include a guide bushing, collar, 1/8 spiral bit, and centering pin for your router base plate. See recommend tools and step by step process below.
Reusable template: These plywood templates can be reused multiple times if removed carefully and used with this double-sided tape (which won’t damage the wood or leave any residue). Plywood templates may not be suited for large batch production.
Dimensions:
Template is 8.5″ wide by 9.5″ tall (216 x 241 mm)
Bow tie sizes yielded (approximately): 3.5″ x 1.4″ (88 x 35 mm), 4.25″ x 1.7″ (107 x 33 mm), 5″ x 2″ (126 x 50 mm)
Template is made from 4 mm high quality plywood.
Recommended tools:
- This router template
- Plunge router
- Router inlay kit
- Straight bit
- Double-sided tape
Recommended process to inlay a bow tie:
- Secure your workpiece to the work surface.
- Secure the template to your workpiece using this double-sided tape.
- Make sure to center your router’s base plate using the centering pin included in the router inlay kit.
- Using the 1/8 spiral bit and guide bushing with the collar, follow the inside contour of the template (in a clockwise direction) to carve the outline of the shape.
- Use a larger shallow plunge bit like this one to carve out the rest of the inner shape (remove the guide bushing for this). Be mindful to stay inside the shape and not touch the edges.
- Carefully remove the template. Secure it to the blank you want to use to cut the bow tie using double-sided tape.
- Using the 1/8 spiral bit and guide bushing without the collar, follow the inside contour of the template (in a clockwise direction). Make sure to keep the guide bushing tight against the template at all times.
- Carefully remove the template. Use a bandsaw to release the shape from the blank.
- After a test fit (it helps to sand the corners on the backside) apply glue and tap into place using a rubber mallet. Clamp and let dry.
- Sand until flush, then apply finish.
Tip: You may not achieve perfect results on the first try, so it is recommended to practice first.


Reviews
There are no reviews yet.