Looking for woodworking gift ideas you can make for the holidays this year? In this tutorial, I’ll show you 4 woodworking gifts you can make from wood including a Mölkky game (also called Finska), a pear-shaped trivet, a growth chart ruler and a modern wall wine rack.
Looking for even more gift ideas? Check out my previous holiday gifts you can make from wood editions!
4 Woodworking Gifts You Can Make
1. DIY Mölkky Game

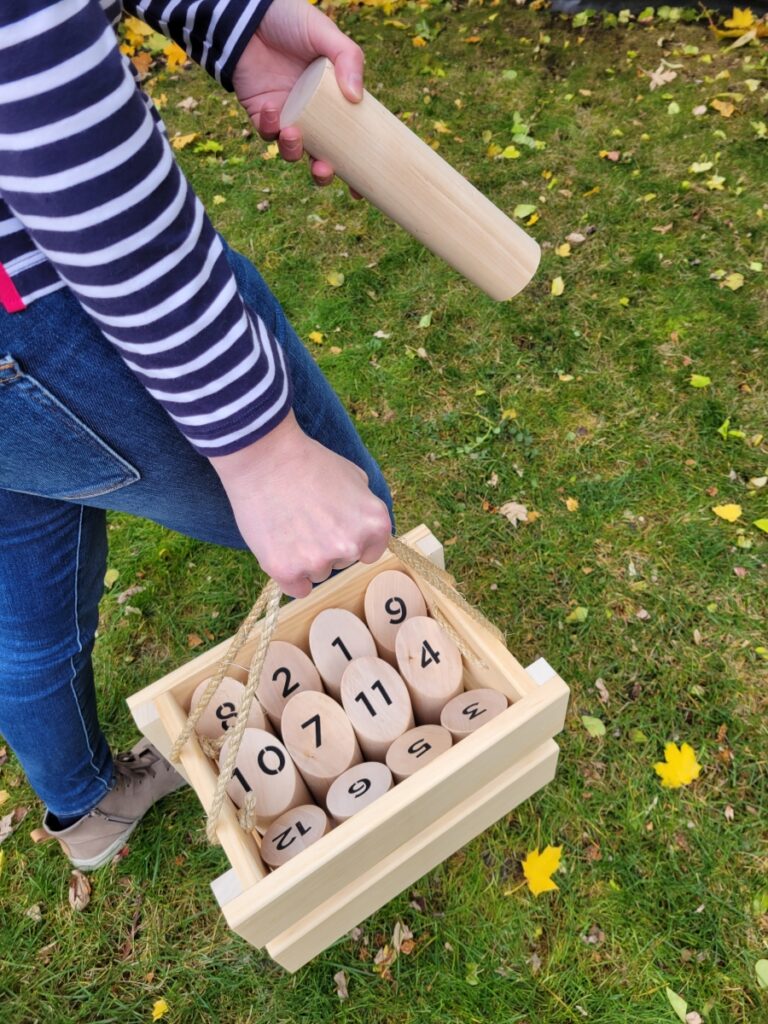
Ever heard of Mölkky? It’s Finnish throwing game, with the goal being to score exactly 50 points by knocking down the right pins. The game is made up of 12 pins (called skittles) and a throwing pin. It’s so easy to play and tons of fun at a barbecue with friends or at the beach. You can read the basic rules of the game here if you want to learn more.
Tools and Materials:
- 2-1/4 inch dowel @ 8 feet
- 1×4 pine wood @ 16 feet
- Stencils https://amzn.to/3wLdSTZ
- Acrylic paint https://amzn.to/3Fuiill
- Mini paint brush https://amzn.to/3C8LBrv
- Clamp https://amzn.to/3HmLtbo
- Drywall square https://amzn.to/3D9PRIt
- Roundover bit https://amzn.to/30sU8Zh
- Gorilla wood glue https://amzn.to/3oxwnYm
- Brad nailer https://amzn.to/3c7ceSY
- Rope https://amzn.to/3wIuL1r
Mölkky Skittles
To start, you’ll need some 2-1/4 inch dowel, at least 7 feet long. I used two 48-inch pieces. Use a long ruler like a drywall square to trace a line spanning its full length. Then, mark that line every 6 inches.
Next, set your miter saw at 45 degrees to start, and simply line up the tips of the blade with the first marking. Then make the cut. Just like that, we have our first skittle. You can then swing the saw back 90 degrees and make the cut on the second marking. After that, it’s just a matter of alternating between 45 and 90 degree cuts until you have 12 skittles.
Cut the remaining piece of dowel to 8-7/8 inches. This piece will be the throwing pin. At this point, it’s a good idea to sand all the skittles and the throwing pin until smooth.
Each skittle gets numbered from 1 to 12 on the top slanted cross section of the dowel. For this, I used 1-inch stick-on stencils with black acrylic crafts paint and a stencil brush. Simply stick on the stencil and dab the paint on. Allow to dry a few minutes and peel away the stencil.
Mölkky Crate
You could just stop here, but I’m also going to build the Mölkky carrying crate. For this, you’ll need some 1×4 pine. I bought two 8 foot lengths of S4S pine wood (not the construction grade stuff). You’ll also need a small piece of thin plywood and about 3 feet of rope.
Cut list:
- (4) 1×4 pine @ 12-1/4 inches – long sides
- (4) 1×4 pine @ 7 inches – short sides
- (4) 3/4 x 3/4 pine @ 8-1/2 inches – corner pegs
- (2) 3/4 x 3/4 pine @ 9-1/4 inches – bottom supports
- (1) 1/4-inch plywood @ 7 x 9-1/4 – bottom
For the official look, you’ll want to round the edges on one side of the pine boards, but this is totally optional. Next, you can cut all the pieces to size as per the cut list above. Before moving onto assembly, grab 2 of the short sides and drill a pair of holes using a drill bit that matches your rope size. Make the holes on center, roughly 4 inches apart.
Assembling the box is super easy, one side at a time. Start with 2 corner pegs and make one of the shorter sides first. Align the boards with the ends of the pegs, leaving a gap between the two boards. All you need is a little glue and some brad nails.
Once the short sides are assembled, flip them upwards with the rounded sides facing inwards, then repeat the same steps for the long sides using glue and brand nails.
Now all that’s missing is the bottom. Flip the box upside down and secure the bottom supports flush with the bottom, again using more glue and nails. Now flip the box upright again and add some glue to the bottom supports, and just drop in the plywood bottom. You can add a add a little weight on it while it dries.
The last step is to thread in the rope handle. Once you’re happy with the length, tie off the ends and trim the rope.
That’s it! Load up the crate with the 12 skittles and the throwing pin, and have fun!
2. Pear-shaped Trivet

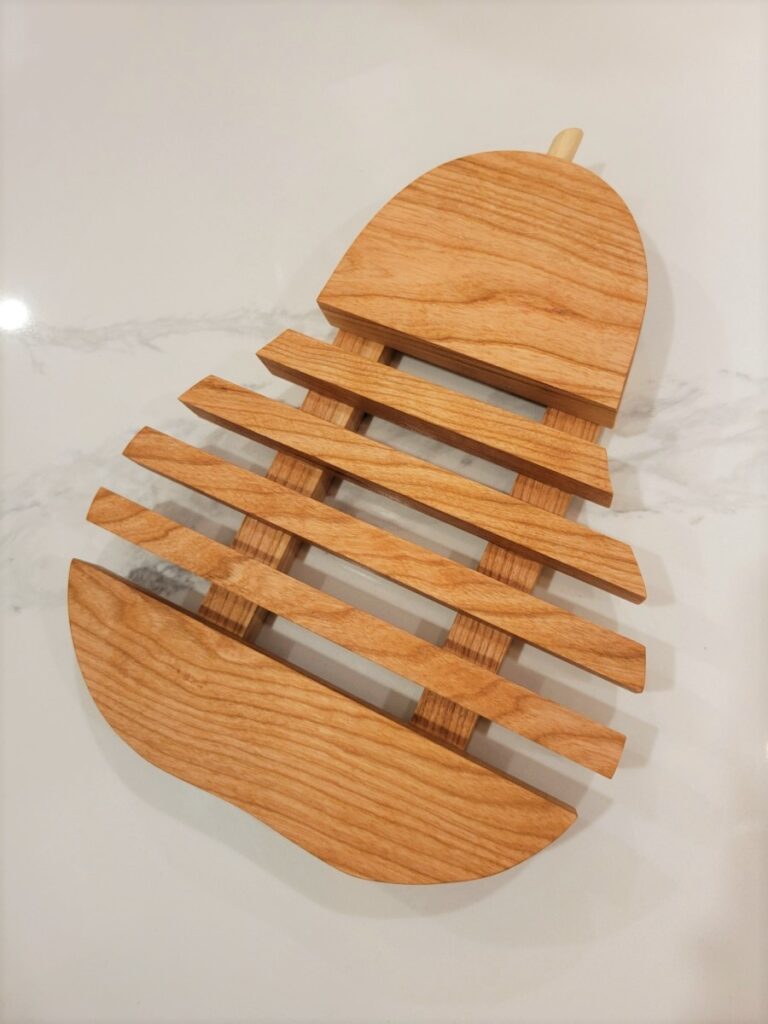
My second woodworking gift idea is a really cool looking trivet that will be shaped like a pear! This one is really simple to make if you have a bandsaw, but it could work with a jigsaw too.
Tools and Materials:
- Cherry wood (3/4-inch thick)
- 3/8 dowel
- Clamps https://amzn.to/3DgRtjA
- CA glue & accelerator https://amzn.to/3Ciw1JM
- Tung oil https://amzn.to/3olynCK
- Spray adhesive https://amzn.to/3wJXBP0
- Gorilla wood glue https://amzn.to/3oxwnYm
I’m using cherry wood that I’ll cut up into 3 sections to begin:
Cut list:
- Top: 4 x 3 inches
- Middle: 8 x 3 inches – the middle section should be ripped lengthwise in to four 1/2-inch strips
- Bottom: 8 x 3 inches
- Cross supports: (2) 3/4 x 7 inches
To assemble the trivet, you’ll need a bunch of half inch spacers. I used little blocks of 1/2-inch plywood. Position spacers between each piece, then lightly clamp it all together.
To complete the shape, you’ll need to connect the pieces with two small cross supports from underneath. Working upside down, deliberately apply CA glue to one part and spray some accelerator on one of the cross supports. Then position it and hold it down for about 30 seconds. After gluing down the other strip, remove the clamps and the spacers.
At this point you could really make this trivet into any shape that you want. I made this pear template that you can download for free here. To temporarily secure the template to the wood, I’ll use some light adhesive spray and line up the lines on the template with the slats in the wood, then press down.
The easiest way to cut this shape out is by using a bandsaw, but you could always give it a shot with a jigsaw if that’s all you’ve got. I’ll be honest and say I have very little experience cutting curves on a bandsaw and I’m not great at it. So, I decided to cut the shape a bit wide and stay just outside the lines. I could then use my oscillating sander to refine the shape, progressively sanding to the line.
I can now peel off the template and hey, look at that, it looks like a pear! But… one thing is still missing. A stem! Drill a shallow hole at the top of the pear using a 3/8 drill bit. Next, cut a short piece of 3/8 dowel with a 30 degree angle on one end. Then glue it into the hole.
To finish the trivet, I’m going with Tung oil which will keep the wood looking natural and hold up to heat better than a varnish would.
3. DIY Wall Mounted Wine Rack

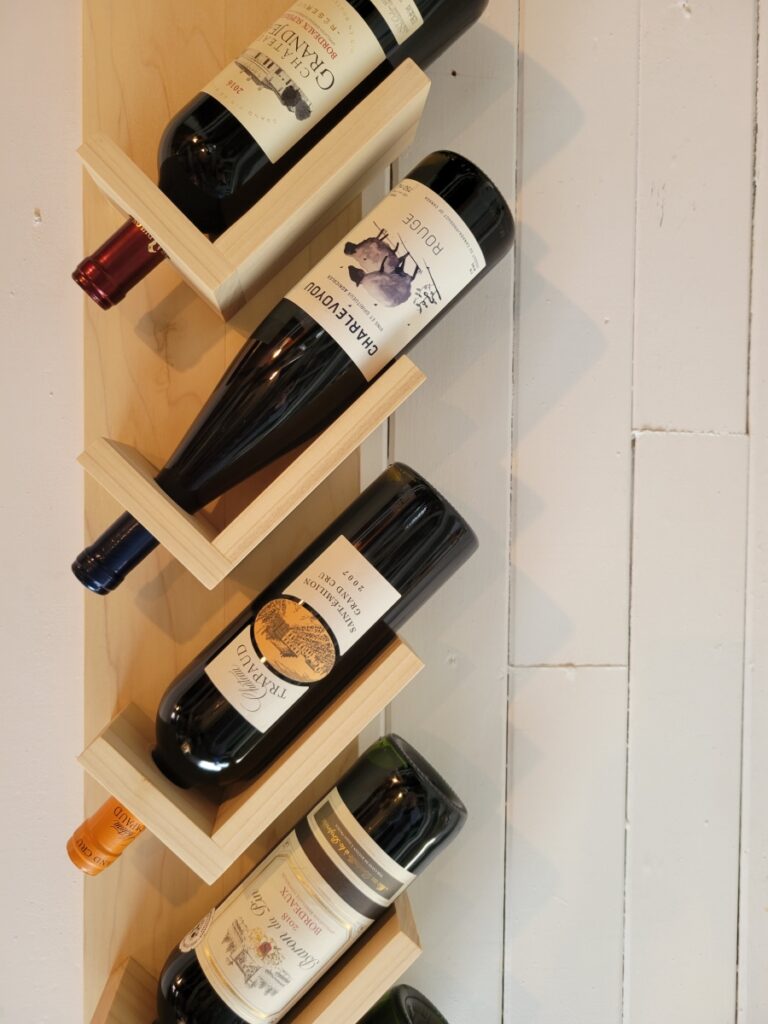
The next gift I’m going to make is a modern wall mounted wine rack.
Tools and Materials
- 1×4 poplar wood
- Dowel pins https://amzn.to/3ndav51
- Clamps https://amzn.to/3DgRtjA
- Gorilla wood glue https://amzn.to/3oxwnYm
- Combination square (12-inch) https://amzn.to/3DeVwNv
- CA glue & accelerator https://amzn.to/3Ciw1JM
- Keyhole router bit https://amzn.to/3wGZJXP
- Osmo Polyx-oil https://amzn.to/3HjFKmK
For this I’ll use some 1×4 poplar wood. Now ideally I would also have a 1×8 piece to use for the backing, but I’m just going to cut and glue two 1×4 pieces into a wider board instead, and this will work just as well.
Cut list:
- 1 @ 36 x 7 inches
- 5 @ 3 x 6 inches
- 5 @ 3 x 4 inches
We’ll start by making holes in the shorter 3×4 pieces. This will act as a cradle for the bottlenecks. The hole should be made slightly offset, so it looks centered once the bottle cradle is assembled. As such, measure 2-1/2 inches (of the 4-inch side) then mark the center of that line. Use a 1-1/4 inch Forstner bit to drill the hole, making sure to clamp the wood to a scrap backer board to help prevent tearout.
Once the holes are made on all five pieces, I can grab some dowels that I’ll use to assemble the bottle holders. My wood is 3/4 thick so I’ll use some 3/8 dowels. Use a doweling jig to make the dowel holes on the face of the shorter 3×4 pieces and on the end of the 3×6 pieces. Then apply glue to the holes, add the dowel, and clamp until dry.
After that, a little sanding and we are ready for assembly. I’m going to screw these in from the back, but first I’ll need to draw some reference lines so I’ll know where to drill. Using a 45 degree square, I’ll position the bottom one and make a mark on the edge. I set the lowest holder 5 inches from the bottom. I can then make equally spaced markings, every 6-1/2 inches, working my way up from there.
To position the bottle holder, use a 45 degree square set on the first marking and slide the cradle down the edge until the tip hits the midpoint in the board. Then use a pencil to roughly trace it out and repeat for the other cradles using the same process.
You can then roughly mark out the screw holes within those lines. Next, use a small drill bit to make some pilot holes. Then flip over the board and use a countersink bit and go back over all the pilot holes.
To temporarily hold the bottle cradles on while I screw them down, I’ll use a few dabs of CA glue and spray some accelerator on the other piece, then hold it down for 30 seconds. I can then flip it over and drive the screws into the pilot holes.
I want this wine rack to be able to sit flush against the wall so I’ll use a keyhole bit to make some keyhole slots. I made this really simple jig a few years ago that I’ll use to make 2 keyhole slots on the backside.
All that’s left is to apply a finish. You could stain if you want. I went with a simple clear finish using 2 coats of Osmo Polyx-oil. Now hang it on the wall and load it up with your wine collection.
4. DIY 3D Growth Chart Ruler

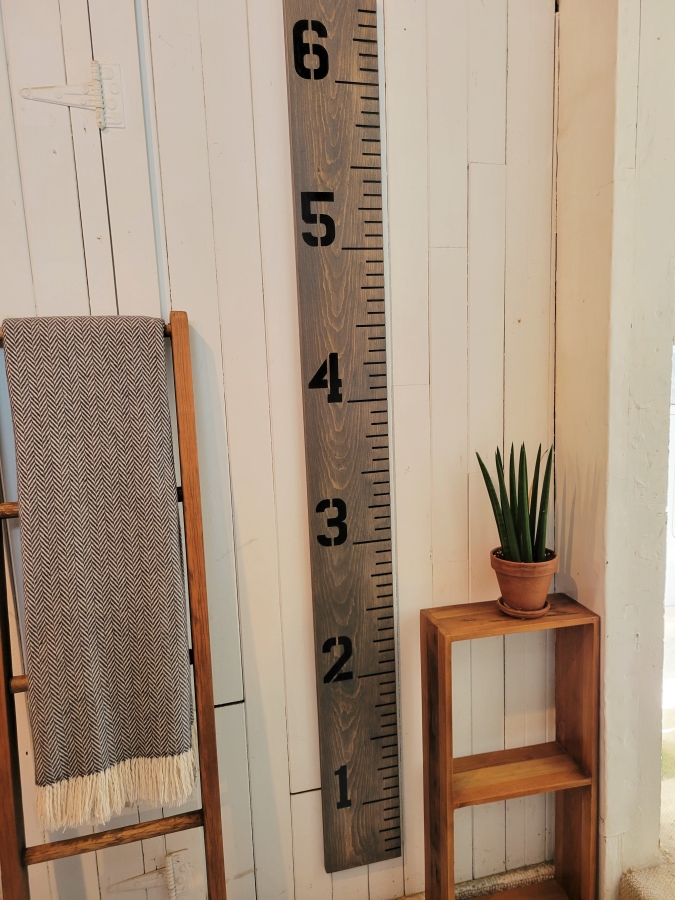
Last but not least, I’m making a growth chart ruler. This is a great gift for anyone with kids.
You’ll need a wide board that’s 6 feet long. I’m using a pine 1×8 that I’ll cut to length on the miter saw.
Tools and Materials:
- Upspiral bit https://amzn.to/3nbrVyK
- Spray paint https://amzn.to/3DipW1a
- Wood stain https://amzn.to/2YKoB4h
- Spray varnish https://amzn.to/3C8NkwZ
- Acrylic paint https://amzn.to/3Fuiill
- Mini paint brush https://amzn.to/3C8LBrv
- Keyhole router bit https://amzn.to/3wGZJXP
- Face clamp https://amzn.to/3qzsQLz
- Combination square https://amzn.to/3DeVwNv
- Gorilla wood glue https://amzn.to/3oxwnYm
- Brad nailer https://amzn.to/3c7ceSY
- 4-inch number stencils https://amzn.to/30eXRJD
There are a lot of different ways to make a growth chart. I want to give it a 3D look so I’m going to use my router to make all the ruler lines. Start by marking the edge of the board at every inch mark. An important note here is that the growth chart should actually start at the 6-inch mark and that’s so you can hang it on the wall without your baseboards interfering.
After marking out each inch, I’ll lengthen the lines using a combination square. For a cooler look, the lines will have varying lengths, just like a real ruler. Here are the lengths of the markings I used:
- Regular inch marks = 1-1/2 inch
- 1/4-foot and 3/4-foot = 2 inches
- 1/2-foot = 2-1/2 inches
- Full foot = 3-1/2 inches
Once you reach the top of the ruler you should be at 6-½ feet, with every inch marked out.
Growth Chart router Jig
To carve the lines, I’m going to build a simple router jig with a 1/8 upspiral bit. I measured my router base and mine is 3-½ inches so I’ll make my jig that width. I’m using 3/4 x 1-1/2 inch pine wood for this.
Cut list:
- 4 @ 3-1/2 inches (adjust to the width of your router’s base plate)
- 2 @ 12 inches
- 3 @ 9 inches
For more details on how to assemble and use the jig, be sure to check out this video.
After all the lines are routed out, you can use black spray paint to fill them in. Once dry, use an orbital sander to sand away the paint on the surface, leaving only the paint in the 3D lines.
Just as for the wine rack, you can use this keyhole jig to add 2 keyhole slots to the back so the ruler can be hung flat on the wall.
To finish the growth chart, I’ll apply some classic grey stain. Once the stain had dried, I painted on the numbers using these 4-inch stencils. I’m using black acrylic crafts paint with a stencil brush to gently dab on the paint. This method is less likely to bleed than using spray paint and the less paint you have on your brush the better.
After the paint was dry, I could spray on a few clear coats to seal and protect it. Be sure to hang it 6 inches off the floor and watch them grow!

2 comments on “Woodworking Gifts You Can Make”